* FTP access is included with all web hosting
accounts
- For PC Users (CuteFTP)
The account information which we emailed you
contained the following information which is
needed for FTP access to your account:
Login
Password
FTP Server
- Step 1: Downloading
CuteFTP
a) To download this program, please go to:
http://cuteftp.com/download/index.shtml
b) Select the second option, "CuteFTP x.x
for Win95/98/NT 4/2000 32 bit (English)".
Should you need another version in a different
language, feel free to select whichever one
applies to you.
c) Scroll to the bottom of the page, enter
your email address where specified and then
select the Download Now button.
d) You will come to a new page. Look to the
right side of the page for the "Download
Now" link and click on it.
e) On the next page, wait a few seconds and
then you will be prompted to save the file to
your hard drive. Click OK and then either navigate
to a folder of your choice or accept the default
location. Either way, be sure you know exactly
where the downloaded file will be saved so that
you can easily retrieve it.
- Step 2: Installing
CuteFTP
a) When the download is complete, locate the
file on your hard drive and double click on
it to begin installation.
b) Select Next to the first
box.
c) Select I Agree to the disclaimer.
d) Click Next to proceed with
the installation.
e) When asked to make Cute FTP your default
HTML editor...click NO.
f) Click "Finished"
g) Double Click on the new, little yellow CuteFTP
icon on your desktop.
- Step 3: Configuring CuteFTP
a) You will see a dialog that prompts
you about registering the program. Simply select
Close (or register if you choose).
Then, when the program opens you'll get a "Tips"
dialog box. Simply Close that
as well.

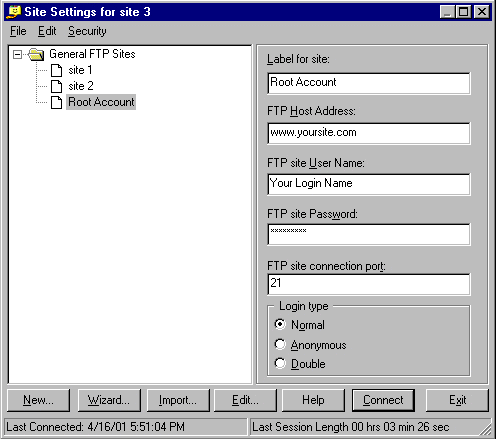
b) You should now be looking at the Site
Manager screen. Click on General
FTP sites at the very top of the list
and then select the New button
located in the lower left corner of the dialog
box.
c) On the left side of the Site Manager you'll
notice a field called Label For Site.
This is simply the name you want associated
with your FTP account. To keep things consistent,
please use your domain name in this field.
d) In the FTP host address
field put your server hostname, please refer
to the account information email we sent you
after signup.
e) In the FTP site username
field put your account username. For the FTP
site password put your account password.
(both of this information can be found in the
login email we sent you after signup. )
f) You are now ready to connect to your server.
Please select Connect and it
will begin the login process. Please note, depending
on the speed of your internet connection and
network traffic at the time, this process can
take between 10 seconds and two minutes. Once
you are logged-in you see a Login Messages
dialog box. Simply click OK
to close it.
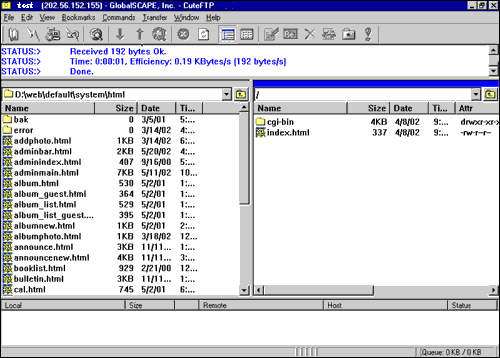
a) Now you will see a two-pane window. Your
hard drive is on the left and your server's
contents are on the right.

b) First, let's get to where you need to be
on the server. In the right window, you should
see a list of directories and files. This is
where you need to put all your website files.
You will also see an index.html
file. This is the default Welcome Page we have
placed into your account. You would want to
be sure that your website's mainpage is also
called index.html so that you
can copy it over the existing Welcome Page.
c) You are now ready to move files from your
hard drive onto your new web space. From the
left panel, simply find the directory on your
hard drive that contains your web page files.
Moving them to your server is as simple as left
clicking on your files in the left panel and
dragging them over to the right panel. Also,
be sure to use lowercase filenames
and don't forget to replace or remove
the current index.html file with your own homepage.
If you don't do this, you may still see the
default Welcome Page even after you have uploaded
your website.
d) When you are finished, select File
and then Disconnect and you're
done.
Back
to Support menu
|