|
Microsoft
Outlook Settings
- Activating your email
account
Before you proceed in configuring your email
client, make sure you have created all your
email accounts through your web based control
panel under email
accounts.
After configuring and activating your email
account, you may then proceed to configure your
email client (eg. Eudora, Netscape Messenger,
Outlook or Outlook Express).
- Configuring Microsoft
Outlook
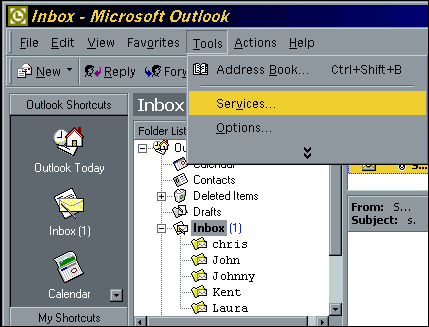
In Microsoft Outlook, go to the Tools menu and
select SERVICES.
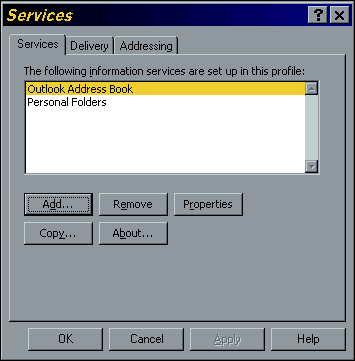
1. If Internet Mail appears in the list of services,
continue with step 2
2. Click Internet E-mail to highlight
it.
3. Click the Properties button.
4. Go to step 9.
5. If Internet E-mail does not appear,
continue with step 6.
6. Click the Add... button.
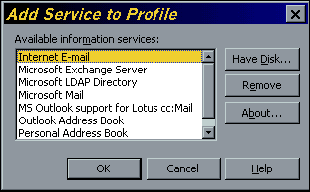
7. In the Add Service to Profile window,
highlight Internet E-mail.
8. Click OK.
9. In the Internet E-mail window, select the
General tab.
10. Enter your full name and e-mail address
under User Information. (Example email
:john@anything.com)
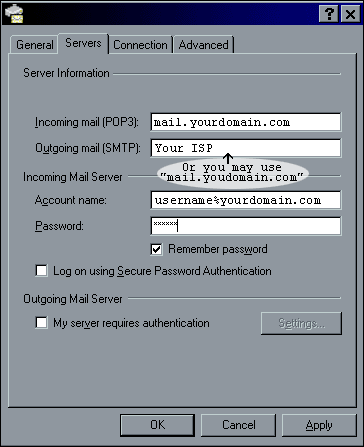
11. Next, select the servers tab.
12. In the Incoming Mail (POP3) field,
enter the POP or mail server that was given
to you. For example: If the domain you registered
is "www.yourdomain.com" then your incoming mail
server would be "mail.yourdomain.com".
13. In the Outgoing Mail (SMTP) field,
we highly recommend using the outgoing or SMTP
server of your Internet Service Provider (ISP).
The reason is because you should experience
faster performance from your own ISP. In some
cases, you will not be able to use your ISPs
SMTP server for sending out emails.
If you are using our SMTP servers please
be sure to set your outgoing mail server to
"mail.yourdomain.com" from within your email
program. Also, please aware that in order
to send email though our servers you must have
successfully checked your account within the
past 60 minutes. Once you have checked your
mail, you will be able to send mail for the
next 60 minutes. We have our server setup this
way so that spammers cannot access our smtp
servers so easily. Otherwise spammers could
relay their bulk mail through your account and
send out millions of emails. Not only is spamming
illegal in some states, but it is also a recipe
for degrading the server performance.
14. In the Account Name field, enter
the login name you created in the web based
control panel. For example: If the user name
you created is "John" and the domain you registered
for is "www.anything.com"; your login name will
be "john%anything.com"
15. Enter your password and check remember
password if you wish to save the password
in the settings and not be prompted for the
password again.
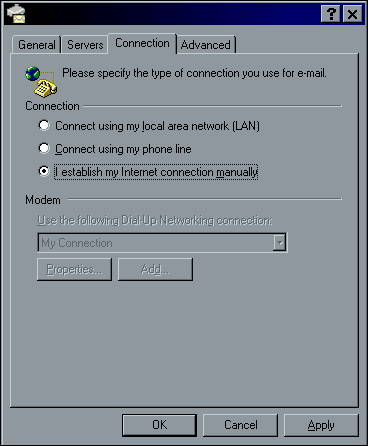
16. Next, select the Connection tab and
check the radio button for "I establish my
internet connection manually"
17. Click OK. This completes the basic
setup - you should now be able to send and receive
email in Microsoft Outlook.
Back
to Support menu
|